 自动化构建用户及物料画像
# 自动化构建用户及物料画像
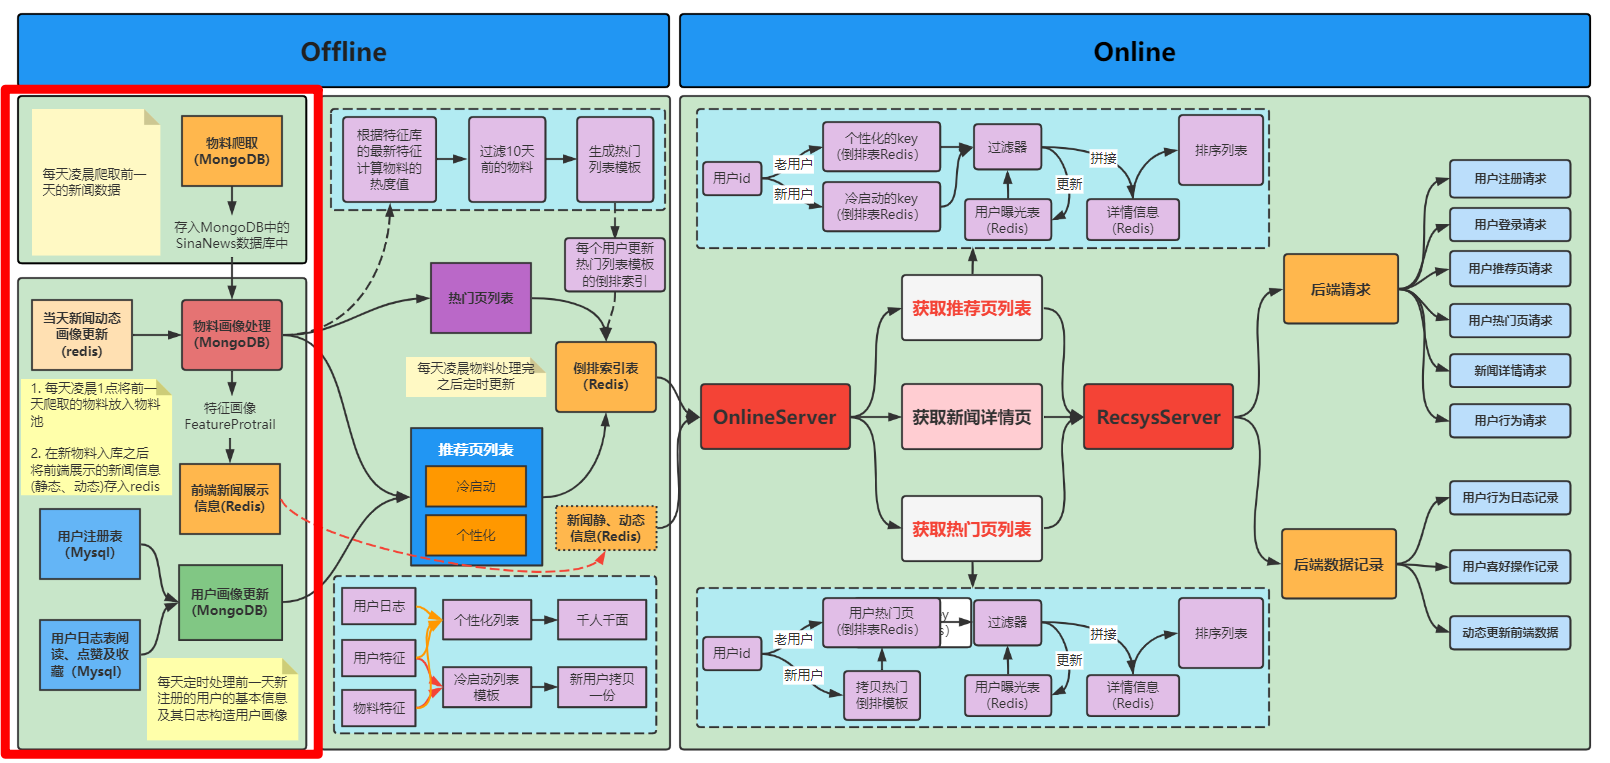
本节内容主要讲的是上图中红框框起来的部分,也就是离线自动化构建用户和物料的画像,这部分内容在新闻推荐系统中是为系统源源不断添加新物料的途径,由于我们的物料是通过爬虫获取的,所以还需要对爬取的数据进行处理,也就是构造新闻的画像。对于用户侧的画像则是需要每天将新注册的用户添加到用户画像库中,对于在系统中产生了行为的用户,我们还需要定期的更新用户的画像(长短期)。下面分别从物料侧和用户侧两个方面来详细解释这两类画像在系统中是如何自动化构建的。
# 物料侧画像的构建
新物料来源
首先要说的就是新物料的来源,物料是通过每天在新闻网站上爬取获取的,爬取新闻详细的内容在[2.2.1.4 Scrapy基础及新闻爬取实战](https://github.com/datawhalechina/fun-rec/blob/master/docs/第二章 推荐系统实战/2.2新闻推荐系统实战/docs/2.2.1.4 scrapy基础及新闻爬取实战.md)中已经详细的聊过了,这里要说明的一点就是,新闻爬取是每天凌晨的时候爬取前一天的新闻,这么做的原因是可以爬到更多的物料,缺点就是物料的时效性会延迟一天,新爬取的物料存储在MongoDB中。
物料画像的更新
物料画像的更新主要有一下几个方面:
- 新物料画像添加到物料库中
- 旧物料画像,通过用户的交互记录进行更新
首先说一下新物料添加到物料库的逻辑是什么,新物料添加到物料库这件事情肯定是发生在新闻爬取之后的,然后要将新物料添加到物料库还需要对新物料做一些简单的画像处理,目前我们定义的画像字段如下(处理后的画像存储在Mongodb):

具体的逻辑就是遍历今天爬取的所有文章,然后通过文章的title来判断这篇文章是否已经在物料库中(新闻网站有可能有些相同的文章会出现在多天)来去重。然后再根据我们定义的一些字段,给画像相应的字段初始化,最后就是存入画像物料池中。
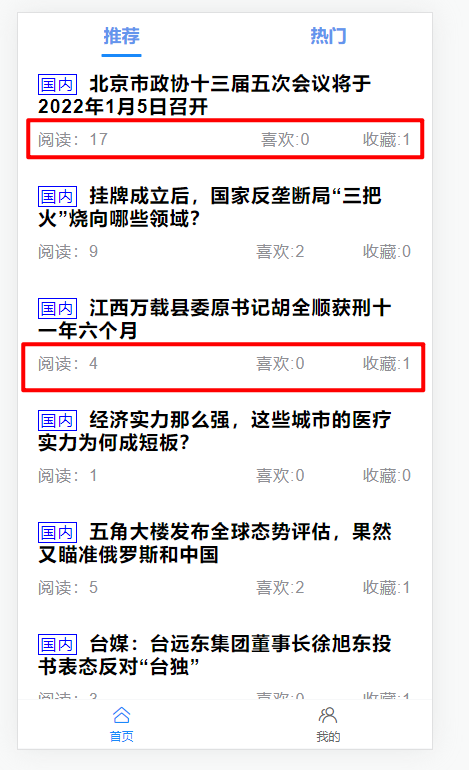
关于旧物料画像的更新,这里就需要先了解一下旧物料哪些字段会被用户的行为更新。下面是新闻列表展示页,我们会发现前端会展示新闻的阅读、喜欢及收藏次数。而用户的交互(阅读、点赞和收藏)会改变这些值。
为了能够实时的在前端显示新闻的这些动态行为信息,我们提前将新闻的动态信息存储到了redis中,线上获取的时候是直接从redis中获取新闻的数据,并且如果用户对新闻产生了交互,那么这些动态信息就会被更新,我们也是直接更新redis中的值,这样做主要是为了能够让前端可以实时的获取的新闻最新的动态画像信息。
通过上面的内容我们了解到,新闻的动态画像的更新是在redis中进行的,而redis又是一个内存数据库,资源是非常宝贵的,我们不能一直将新闻的信息存储在里面,而是每天进行一次更新,只更新哪些今天可能会被用来展示的新闻(有些新闻可能从发表到现在太久了,由于新闻的时效性就没有必要再展示了)。所以为了能够保存新闻历史的动态信息,系统还需要每天将redis中的动态新闻信息更新到mongodb存储的新闻画像库中,这里的逻辑也是每天会定时触发,这里的逻辑会放在更新完新物料的画像之后,当然这里两个的先后顺序并没有什么影响,只需要注意更新物料动态画像的时候一定得再redis数据清空之前。
其实这里还有个逻辑需要说明一下,新闻的画像库其实是有两个的,一个被称为是特征库FeatureProtrail, 它存储了物料的所有字段。还有一个是存储前端展示内容的画像库RedisProtrail, 这个画像库中的物料是一样的多,只不过每个物料存储的内容不一样,这个特征库的内容每天都会被更新,作为存储再redis中的新闻内容的备份内容。所以在完成了新、旧物料画像的更新之后,我们需要将最新的物料库中的新闻信息往RedisProtrail物料库中写一份,并去掉一些前端展示不需要的字段内容。
关于物料画像的更新的核心代码:
# -*- coding: utf-8 -*-
from re import S
import sys
import json
sys.path.append("../")
from material_process.utils import get_key_words
from dao.mongo_server import MongoServer
from dao.redis_server import RedisServer

"""
新闻画像中包含的字段:
0. news_id 新闻的id
1. title 标题
2. raw_key_words (爬下来的关键词,可能有缺失)
3. manual_key_words (根据内容生成的关键词)
4. ctime 时间
5. content 新闻具体内容
6. cate 新闻类别
7. likes 新闻点赞数量
8. collections 新闻收藏数量
9. read_nums 阅读次数
10. url 新闻原始链接
"""

class NewsProtraitServer:
    def __init__(self):
        """初始化相关参数
        """
        self.mongo_server = MongoServer()
        self.sina_collection = self.mongo_server.get_sina_news_collection()
        self.material_collection = self.mongo_server.get_feature_protrail_collection()
        self.redis_mongo_collection = self.mongo_server.get_redis_mongo_collection()
        self.news_dynamic_feature_redis = RedisServer().get_dynamic_news_info_redis()

    def _find_by_title(self, collection, title):
        """从数据库中查找是否有相同标题的新闻数据
        数据库存在当前标题的数据返回True, 反之返回Flase
        """
        # find方法,返回的是一个迭代器
        find_res = collection.find({"title": title})
        if len(list(find_res)) != 0:
            return True
        return False

    def _generate_feature_protrail_item(self, item):
        """生成特征画像数据,返回一个新的字典
        """
        news_item = dict()
        news_item['news_id'] = item['news_id']
        news_item['title'] = item['title']
        # 从新闻内容中提取的关键词没有原始新闻爬取时的关键词准确,所以手动提取的关键词
        # 只是作为一个补充,当原始新闻中没有提供关键词的时候可以使用
        news_item['raw_key_words'] = item['raw_key_words']
        key_words_list = get_key_words(item['content'])
        news_item['manual_key_words'] = ",".join(key_words_list)
        news_item['ctime'] = item['ctime']
        news_item['content'] = item['content']
        news_item['cate'] = item['cate']
        news_item['url'] = item['url']
        news_item['likes'] = 0
        news_item['collections'] = 0
        news_item['read_num'] = 0
        news_item['hot_value'] = 1000 # 初始化一个比较大的热度值,会随着时间进行衰减

        return news_item

    def update_new_items(self):
        """将今天爬取的数据构造画像存入画像数据库中
        """
        # 遍历今天爬取的所有数据
        for item in self.sina_collection.find():
            # 根据标题进行去重
            if self._find_by_title(self.material_collection, item["title"]):
                continue
            news_item = self._generate_feature_protrail_item(item)
            # 插入物料池
            self.material_collection.insert_one(news_item)

        print("run update_new_items success.")

    def update_redis_mongo_protrail_data(self):
        """每天都需要将新闻详情更新到redis中,并且将前一天的redis数据删掉
        """
        # 每天先删除前一天的redis展示数据,然后再重新写入
        self.redis_mongo_collection.drop()
        print("delete RedisProtrail ...")
        # 遍历特征库
        for item in self.material_collection.find():
            news_item = dict()
            news_item['news_id'] = item['news_id']
            news_item['title'] = item['title']
            news_item['ctime'] = item['ctime']
            news_item['content'] = item['content']
            news_item['cate'] = item['cate']
            news_item['url'] = item['url']
            news_item['likes'] = 0
            news_item['collections'] = 0
            news_item['read_num'] = 0

            self.redis_mongo_collection.insert_one(news_item)
        print("run update_redis_mongo_protrail_data success.")

    def update_dynamic_feature_protrail(self):
        """用redis的动态画像更新mongodb的画像
        """
        # 遍历redis的动态画像,将mongodb中对应的动态画像更新
        news_list = self.news_dynamic_feature_redis.keys()
        for news_key in news_list:
            news_dynamic_info_str = self.news_dynamic_feature_redis.get(news_key)
            news_dynamic_info_str = news_dynamic_info_str.replace("'", '"' ) # 将单引号都替换成双引号
            news_dynamic_info_dict = json.loads(news_dynamic_info_str)

            # 查询mongodb中对应的数据,并将对应的画像进行修改
            news_id = news_key.split(":")[1]
            mongo_info = self.material_collection.find_one({"news_id": news_id})
            new_mongo_info = mongo_info.copy()
            new_mongo_info['likes'] = news_dynamic_info_dict["likes"]
            new_mongo_info['collections'] = news_dynamic_info_dict["collections"]
            new_mongo_info['read_num'] = news_dynamic_info_dict["read_num"]

            self.material_collection.replace_one(mongo_info, new_mongo_info, upsert=True) # upsert为True的话,没有就插入
        print("update_dynamic_feature_protrail success.")


# 系统最终执行的不是这个脚本,下面的代码是用来测试的
if __name__ == "__main__":
    news_protrait = NewsProtraitServer()
    # 新物料画像的更新
    news_protrait.update_new_items()
    # 更新动态特征
    news_protrait.update_dynamic_feature_protrail()
    # redis展示新闻内容的备份
    news_protrait.update_redis_mongo_protrail_data()
2
3
4
5
6
7
8
9
10
11
12
13
14
15
16
17
18
19
20
21
22
23
24
25
26
27
28
29
30
31
32
33
34
35
36
37
38
39
40
41
42
43
44
45
46
47
48
49
50
51
52
53
54
55
56
57
58
59
60
61
62
63
64
65
66
67
68
69
70
71
72
73
74
75
76
77
78
79
80
81
82
83
84
85
86
87
88
89
90
91
92
93
94
95
96
97
98
99
100
101
102
103
104
105
106
107
108
109
110
111
112
113
114
115
116
117
118
119
120
121
122
123
124
125
126
127
128
129
130
131
132
133
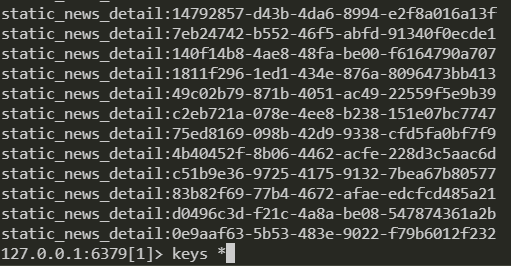
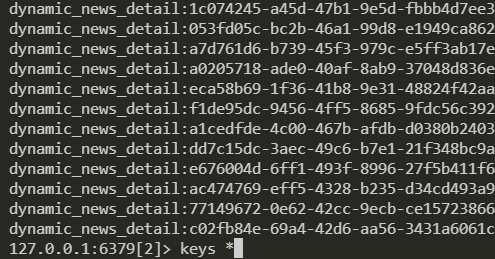
上面的内容说完了物料的更新,接下来介绍一下对于更新完的物料是如何添加到redis数据库中去的。关于新闻内容在redis中的存储,我们将新闻的信息拆成了两部分,一部分是新闻不会发生变化的属性(例如,创建时间、标题、新闻内容等),还有一部分是物料的动态属性,在redis中存储的key的标识分别为:static_news_detail:news_id和dynamic_news_detail:news_id 下面是redis中存储的真实内容
这么做的目的是为了线上实时更改物料动态信息的时候更加高效一点。当需要获取某篇新闻的详细信息的时候需要查这两份数据并将数据这两部分数据拼起来最终才发送给前端展示。这部分的代码逻辑如下:
import sys
sys.path.append("../../")
from dao.mongo_server import MongoServer
from dao.redis_server import RedisServer


class NewsRedisServer(object):
    def __init__(self):
        self.rec_list_redis = RedisServer().get_reclist_redis()
        self.static_news_info_redis = RedisServer().get_static_news_info_redis()
        self.dynamic_news_info_redis = RedisServer().get_dynamic_news_info_redis()

        self.redis_mongo_collection = MongoServer().get_redis_mongo_collection()

        # 删除前一天redis中的内容
        self._flush_redis_db()

    def _flush_redis_db(self):
        """每天都需要删除redis中的内容,更新当天新的内容上去
        """
        try:
            self.rec_list_redis.flushall()
        except Exception:
            print("flush redis fail ... ")

    def _get_news_id_list(self):
        """获取物料库中所有的新闻id
        """
        # 获取所有数据的news_id,
        # 暴力获取,直接遍历整个数据库,得到所有新闻的id
        # TODO 应该存在优化方法可以通过查询的方式只返回new_id字段
        news_id_list = []
        for item in self.redis_mongo_collection.find():
            news_id_list.append(item["news_id"])
        return news_id_list

    def _set_info_to_redis(self, redisdb, content):
        """将content添加到指定redis
        """
        try:
            redisdb.set(*content)
        except Exception:
            print("set content fail".format(content))

    def news_detail_to_redis(self):
        """将需要展示的画像内容存储到redis
        静态不变的特征存到static_news_info_db_num
        动态会发生改变的特征存到dynamic_news_info_db_num
        """
        news_id_list = self._get_news_id_list()

        for news_id in news_id_list:
            news_item_dict = self.redis_mongo_collection.find_one({"news_id": news_id}) # 返回的是一个列表里面套了一个字典
            news_item_dict.pop("_id")

            # 分离动态属性和静态属性
            static_news_info_dict = dict()
            static_news_info_dict['news_id'] = news_item_dict['news_id']
            static_news_info_dict['title'] = news_item_dict['title']
            static_news_info_dict['ctime'] = news_item_dict['ctime']
            static_news_info_dict['content'] = news_item_dict['content']
            static_news_info_dict['cate'] = news_item_dict['cate']
            static_news_info_dict['url'] = news_item_dict['url']
            static_content_tuple = "static_news_detail:" + str(news_id), str(static_news_info_dict)
            self._set_info_to_redis(self.static_news_info_redis, static_content_tuple)

            dynamic_news_info_dict = dict()
            dynamic_news_info_dict['likes'] = news_item_dict['likes']
            dynamic_news_info_dict['collections'] = news_item_dict['collections']
            dynamic_news_info_dict['read_num'] = news_item_dict['read_num']
            dynamic_content_tuple = "dynamic_news_detail:" + str(news_id), str(dynamic_news_info_dict)
            self._set_info_to_redis(self.dynamic_news_info_redis, dynamic_content_tuple)

        print("news detail info are saved in redis db.")


if __name__ == "__main__":
    # 每次创建这个对象的时候都会把数据库中之前的内容删除
    news_redis_server = NewsRedisServer()
    # 将最新的前端展示的画像传到redis
    news_redis_server.news_detail_to_redis()
2
3
4
5
6
7
8
9
10
11
12
13
14
15
16
17
18
19
20
21
22
23
24
25
26
27
28
29
30
31
32
33
34
35
36
37
38
39
40
41
42
43
44
45
46
47
48
49
50
51
52
53
54
55
56
57
58
59
60
61
62
63
64
65
66
67
68
69
70
71
72
73
74
75
76
77
78
79
80
81
**到此位置,离线物料画像的更新逻辑就介绍完了,最后把上面的逻辑用代码全部串起来的话就如下代码:**下面的代码是会在每天定时运行的,这样就将物料侧的画像构建逻辑穿起来了
from material_process.news_protrait import NewsProtraitServer
from material_process.news_to_redis import NewsRedisServer

def process_material():
    """物料处理函数
    """
    # 画像处理
    protrail_server = NewsProtraitServer()
    # 处理最新爬取新闻的画像,存入特征库
    protrail_server.update_new_items()
    # 更新新闻动态画像, 需要在redis数据库内容清空之前执行
    protrail_server.update_dynamic_feature_protrail()
    # 生成前端展示的新闻画像,并在mongodb中备份一份
    protrail_server.update_redis_mongo_protrail_data()

    # 新闻数据写入redis, 注意这里处理redis数据的时候是会将前一天的数据全部清空
    news_redis_server = NewsRedisServer()
    # 将最新的前端展示的画像传到redis
    news_redis_server.news_detail_to_redis()


if __name__ == "__main__":
    process_material()
2
3
4
5
6
7
8
9
10
11
12
13
14
15
16
17
18
19
20
21
22
23
# 用户侧画像的构建
对于用户画像的更新来说主要分为两方面:
- 新注册用户画像的更新
- 老用户画像的更新
由于我们系统中将所有注册过的用户都放到了一个表里面(新、老用户),所以每次更新画像的话只需要遍历一遍注册表中的所有用户。再说具体的画像构建逻辑之前,得先了解一下用户画像中包含哪些字段,下面是直接从mongo中查出来的
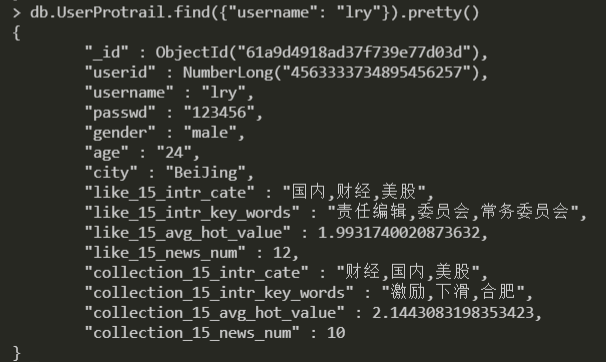
从上面可以看出,主要是用户的基本信息和用户历史信息相关的一些标签,对于用户的基本属性特征这个可以直接从注册表中获取,那么对于跟用户历史阅读相关的信息,需要统计用户历史的所有阅读、喜欢和收藏的新闻详细信息。为了得到跟用户历史兴趣相关的信息,我们需要对用户的历史阅读、喜欢和收藏这几个历史记录给存起来,其实这些信息都可以从日志信息中获取得到,但是这里有个工程上的事情得先说明一下,先看下面这个图,对于每个用户点进一篇新闻的详情页
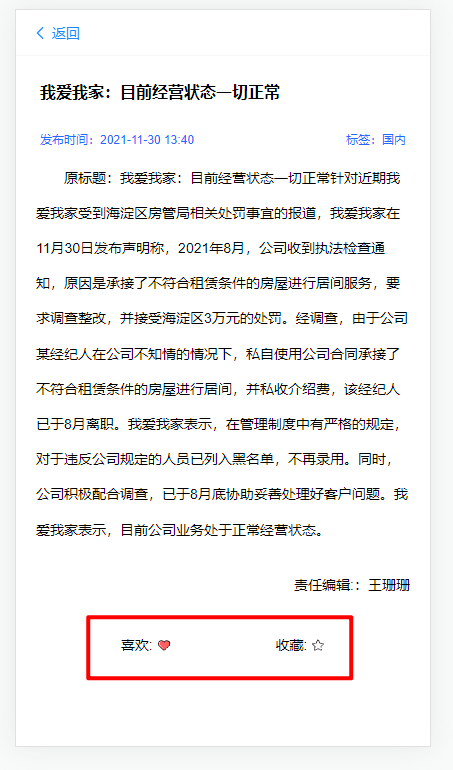
最底部有个喜欢和收藏,这个前端展示的结果是从后端获取的数据,那就意味着后端需要维护一个用户历史点击及收藏过的文章列表,这里我们使用了mysql来存储,主要是怕redis不够用。其实这两个表不仅仅可以用来前端展示用的,还可以用来分析用户的画像,这都给我们整理好了用户历史喜欢和收藏了。
此外前面也提到了我们可以使用用户历史阅读的文章做用户画像,为了更好处理和理解,我们也维护了一份用户历史阅读过的所有文章的mysql表(维护表的核心逻辑就是每天跑一边用户日志,更新一下用户历史阅读的记录),那么此时我们其实已经有了用户的阅读、点赞和收藏三个用户行为表了,接下来就直接可以通过这三个表来做具体的用户兴趣相关的画像了,实现的具体逻辑如下:
import sys
import datetime
from collections import Counter, defaultdict

from sqlalchemy.sql.expression import table
sys.path.append("../../")
from dao.mongo_server import MongoServer
from dao.mysql_server import MysqlServer
from dao.entity.register_user import RegisterUser
from dao.entity.user_read import UserRead
from dao.entity.user_likes import UserLikes
from dao.entity.user_collections import UserCollections


class UserProtrail(object):
    def __init__(self):
        self.user_protrail_collection = MongoServer().get_user_protrail_collection()
        self.material_collection = MongoServer().get_feature_protrail_collection()
        self.register_user_sess = MysqlServer().get_register_user_session()
        self.user_collection_sess = MysqlServer().get_user_collection_session()
        self.user_like_sess = MysqlServer().get_user_like_session()
        self.user_read_sess = MysqlServer().get_user_read_session()

    def _user_info_to_dict(self, user):
        """将mysql查询出来的结果转换成字典存储
        """
        info_dict = dict()

        # 基本属性特征
        info_dict["userid"] = user.userid
        info_dict["username"] = user.username
        info_dict["passwd"] = user.passwd
        info_dict["gender"] = user.gender
        info_dict["age"] = user.age
        info_dict["city"] = user.city

        # 兴趣爱好
        behaviors=["like","collection"]
        time_range = 15
        _, feature_dict = self.get_statistical_feature_from_history_behavior(user.userid,time_range,behavior_types=behaviors)
        for type in feature_dict.keys():
            if feature_dict[type]:
                info_dict["{}_{}_intr_cate".format(type,time_range)] = feature_dict[type]["intr_cate"]  # 历史喜欢最多的Top3的新闻类别
                info_dict["{}_{}_intr_key_words".format(type,time_range)] = feature_dict[type]["intr_key_words"] # 历史喜欢新闻的Top3的关键词
                info_dict["{}_{}_avg_hot_value".format(type,time_range)] = feature_dict[type]["avg_hot_value"] # 用户喜欢新闻的平均热度
                info_dict["{}_{}_news_num".format(type,time_range)] = feature_dict[type]["news_num"] # 用户15天内喜欢的新闻数量
            else:
                info_dict["{}_{}_intr_cate".format(type,time_range)] = ""  # 历史喜欢最多的Top3的新闻类别
                info_dict["{}_{}_intr_key_words".format(type,time_range)] = "" # 历史喜欢新闻的Top3的关键词
                info_dict["{}_{}_avg_hot_value".format(type,time_range)] = 0 # 用户喜欢新闻的平均热度
                info_dict["{}_{}_news_num".format(type,time_range)] = 0 # 用户15天内喜欢的新闻数量

        return info_dict

    def update_user_protrail_from_register_table(self):
        """每天都需要将当天注册的用户添加到用户画像池中
        """
        # 遍历注册用户表
        for user in self.register_user_sess.query(RegisterUser).all():
            user_info_dict = self._user_info_to_dict(user)
            old_user_protrail_dict = self.user_protrail_collection.find_one({"username": user.username})
            if old_user_protrail_dict is None:
                self.user_protrail_collection.insert_one(user_info_dict)
            else:
                # 使用参数upsert设置为true对于没有的会创建一个
                # replace_one 如果遇到相同的_id 就会更新
                self.user_protrail_collection.replace_one(old_user_protrail_dict, user_info_dict, upsert=True)


    def get_statistical_feature_from_history_behavior(self, user_id, time_range, behavior_types):
        """获取用户历史行为的统计特征 ["read","like","collection"] """
        fail_type = []
        sess, table_obj, history = None, None, None
        feature_dict = defaultdict(dict)

        end = datetime.datetime.now().strftime("%Y-%m-%d %H:%M:%S")
        start = (datetime.datetime.now()+datetime.timedelta(days=-time_range)).strftime("%Y-%m-%d %H:%M:%S")

        for type in behavior_types:
            if type == "read":
                sess = getattr(self,"user_{}_sess".format(type))
                table_obj = UserRead
            elif type == "like":
                sess = getattr(self,"user_{}_sess".format(type))
                table_obj = UserLikes
            elif type == "collection":
                sess = getattr(self,"user_{}_sess".format(type))
                table_obj = UserCollections
            try:
                history = sess.query(table_obj).filter(table_obj.userid==user_id).filter(table_obj.curtime>=start).filter(table_obj.curtime<=end).all()
            except Exception as e:
                print(str(e))
                fail_type.append(type)
                continue

            feature_dict[type] = self._gen_statistical_feature(history)

        return fail_type, feature_dict

    def _gen_statistical_feature(self,history):
        """"""
        # 为history 获取特征
        if not len(history): return None
        history_new_id = []
        history_hot_value = []
        history_new_cate = []
        history_key_word = []
        for h in history:
            news_id = h.newid
            newsquery = {"news_id":news_id}
            result = self.material_collection.find_one(newsquery)
            history_new_id.append(result["news_id"])
            history_hot_value.append(result["hot_value"])
            history_new_cate.append(result["cate"])
            history_key_word += result["manual_key_words"].split(",")

        feature_dict = dict()
        # 计算平均热度
        feature_dict["avg_hot_value"] = 0 if sum(history_hot_value) < 0.001 else sum(history_hot_value) / len(history_hot_value)

        # 计算Top3的类别
        cate_dict = Counter(history_new_cate)
        cate_list= sorted(cate_dict.items(),key = lambda d: d[1], reverse=True)
        cate_str = ",".join([item[0] for item in cate_list[:3]] if len(cate_list)>=3 else [item[0] for item in cate_list] )
        feature_dict["intr_cate"] = cate_str

        # 计算Top3的关键词
        word_dict = Counter(history_key_word)
        word_list= sorted(word_dict.items(),key = lambda d: d[1], reverse=True)
        # TODO 关键字属于长尾 如果关键字的次数都是一次 该怎么去前3
        word_str = ",".join([item[0] for item in word_list[:3]] if len(cate_list)>=3 else [item[0] for item in word_list] )
        feature_dict["intr_key_words"] = word_str
        # 新闻数目
        feature_dict["news_num"] = len(history_new_id)

        return feature_dict


if __name__ == "__main__":
    user_protrail = UserProtrail().update_user_protrail_from_register_table()
2
3
4
5
6
7
8
9
10
11
12
13
14
15
16
17
18
19
20
21
22
23
24
25
26
27
28
29
30
31
32
33
34
35
36
37
38
39
40
41
42
43
44
45
46
47
48
49
50
51
52
53
54
55
56
57
58
59
60
61
62
63
64
65
66
67
68
69
70
71
72
73
74
75
76
77
78
79
80
81
82
83
84
85
86
87
88
89
90
91
92
93
94
95
96
97
98
99
100
101
102
103
104
105
106
107
108
109
110
111
112
113
114
115
116
117
118
119
120
121
122
123
124
125
126
127
128
129
130
131
132
133
134
135
136
137
138
139
140
141
到此位置用户画像的基本逻辑就介绍完了,下面是用户画像更新的总体逻辑代码:
from user_process.user_to_mysql import UserMysqlServer
from user_process.user_protrail import UserProtrail

"""
1. 将用户的曝光数据从redis落到mysql中。
2. 更新用户画像
"""

def process_users():
    """将用户数据落 Mysql
    """
    # 用户mysql存储
    user_mysql_server = UserMysqlServer()
    # 用户曝光数据落mysql
    user_mysql_server.user_exposure_to_mysql()

    # 更新用户画像
    user_protrail = UserProtrail()
    user_protrail.update_user_protrail_from_register_table()


if __name__ == "__main__":
    process_users()
2
3
4
5
6
7
8
9
10
11
12
13
14
15
16
17
18
19
20
21
22
23
# 画像自动化构建
上面分别对用户侧和物料侧的画像构建进行了介绍,接下来就是要将上面所有的过程都自动化运行,并且设置好定时任务,其实最核心的一点就是一定要在清除redis数据之前,完成用户和物料画像的构建,下面是构建整个自动化的流程。
物料更新脚本:process_material.py
from material_process.news_protrait import NewsProtraitServer
from material_process.news_to_redis import NewsRedisServer


def process_material():
    """物料处理函数
    """
    # 画像处理
    protrail_server = NewsProtraitServer()
    # 处理最新爬取新闻的画像,存入特征库
    protrail_server.update_new_items()
    # 更新新闻动态画像, 需要在redis数据库内容清空之前执行
    protrail_server.update_dynamic_feature_protrail()
    # 生成前端展示的新闻画像,并在mongodb中备份一份
    protrail_server.update_redis_mongo_protrail_data()


if __name__ == "__main__":
    process_material()
2
3
4
5
6
7
8
9
10
11
12
13
14
15
16
17
18
19
用户画像更新脚本: process_user.py
from user_process.user_to_mysql import UserMysqlServer
from user_process.user_protrail import UserProtrail

"""
1. 将用户的曝光数据从redis落到mysql中。
2. 更新用户画像
"""


def process_users():
    """将用户数据落 Mysql
    """
    # 用户mysql存储
    user_mysql_server = UserMysqlServer()
    # 用户曝光数据落mysql
    user_mysql_server.user_exposure_to_mysql()

    # 更新用户画像
    user_protrail = UserProtrail()
    user_protrail.update_user_protrail_from_register_table()


if __name__ == "__main__":
    process_users()
2
3
4
5
6
7
8
9
10
11
12
13
14
15
16
17
18
19
20
21
22
23
24
redis数据更新脚本:update_redis.py
from material_process.news_protrait import NewsProtraitServer
from material_process.news_to_redis import NewsRedisServer


def update():
    """物料处理函数
    """
    # 新闻数据写入redis, 注意这里处理redis数据的时候是会将前一天的数据全部清空
    news_redis_server = NewsRedisServer()
    # 将最新的前端展示的画像传到redis
    news_redis_server.news_detail_to_redis()


if __name__ == "__main__":
    update()
2
3
4
5
6
7
8
9
10
11
12
13
14
15
最后将上面三个脚本穿起来的shell脚本offline_material_and_user_process.sh:
#!/bin/bash

python=/home/recsys/miniconda3/envs/news_rec_py3/bin/python
news_recsys_path="/home/recsys/news_rec_server"

echo "$(date -d today +%Y-%m-%d-%H-%M-%S)"

# 为了更方便的处理路径的问题,可以直接cd到我们想要运行的目录下面
cd ${news_recsys_path}/materials

# 更新物料画像
${python} process_material.py
if [ $? -eq 0 ]; then
    echo "process_material success."
else
    echo "process_material fail."
fi

# 更新用户画像
${python} process_user.py
if [ $? -eq 0 ]; then
    echo "process_user.py success."
else
    echo "process_user.py fail."
fi

# 清除前一天redis中的数据,更新最新今天最新的数据
${python} update_redis.py
if [ $? -eq 0 ]; then
    echo "update_redis success."
else
    echo "update_redis fail."
fi


echo " "
2
3
4
5
6
7
8
9
10
11
12
13
14
15
16
17
18
19
20
21
22
23
24
25
26
27
28
29
30
31
32
33
34
35
36
crontab定时任务:

将定时任务拆解一下:
0 0 * * * /home/recsys/news_rec_server/scheduler/crawl_news.sh >> /home/recsys/news_rec_server/logs/offline_material_process.log &&

/home/recsys/news_rec_server/scheduler/offline_material_and_user_process.sh >> /home/recsys/news_rec_server/logs/material_and_user_process.log &&

/home/recsys/news_rec_server/scheduler/run_offline.sh >> /home/recsys/news_rec_server/logs/offline_rec_list_to_redis.log
2
3
4
5
前面的crontab语法表示的是每天0点运行下面这一串脚本,上面命令中的 && 表示的是先运行完符号前面的内容再运行后面的命令,所以这里的&&是为了将上面三个任务串联起来,大致的执行逻辑就是:
- 先爬取新闻数据,这里需要注意的是,虽然是今天零点爬数据,但是实际上爬的是前一天的新闻
- 数据爬完之后,离线更新用户画像,物料画像及线上要存储再redis中的画像
- 最后其实是离线推荐的流程,离线将用户的排序列表存到redis中,线上直接取就行了
# 总结
这篇文章主要讲解了新闻推荐系统离线如何通过自动化的形式构建物料和用户的画像,文章比较长,但是整体上把文章最上面的那张图中的逻辑讲清楚了(细节方面的可能需要看代码了)。